Posts

Affordable and large neutral rug!

Image
Are you looking for an affordable neutral rug? Look no further.. We had been on the hunt for a rug that matched our room and didn't break the bank. It's so hard to buy online, since I like to look and feel the rug, but this one had great reviews, the colors we wanted and all at a price that was affordable.  Shipping was quick and it was packaged so well. As soon as I got it inside, I unpackaged it and rolled it out. It took very little time for the wrinkles to flatten out, and I am so happy with how it looks! We bought the  Hillsby Gray Area Rug in the  7'10" x 10'3" It was on sale for $162. What a great deal! The colors are so good, if you are looking for a cream/gray carpet. It is surprisingly soft under the feet for the price.  Also loving the distressed look that it has.  At first we were looking for a rug that had some blues in it, but we decided to go with something a bit more neutral, so that we can mix up our...
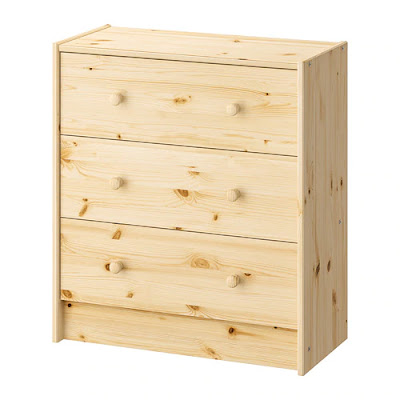
DIY nightstand from IKEA dresser!

Image
Have you seen these IKEA Rast dressers? I bought two of them when they were on sale for $27, and followed a tutorial on how to make them into this nightstand.  First, you will need to get your dresser. You can find them here .  IKEA RAST dresser Once you have your dresser, you will need to get the trim pieces.  I bought my trim pieces from Lowes, but you can find them at Home Depot too. I bough six trim pieces per dresser. So 12 trim pieces for both dressers.  Buy your top piece. For the top, you'll need to get a 1x16 inch board and have it cut down to 12 3/4''. You can ask the people at Lowes to cut it for you if you don't have a saw to cut it yourself. Once you have your trim, and your top (cut to 1x12 3/4 x 26 5/8''), it will be time to cut your trim to size.  You will want to cut your trim pieces as follows:  For each drawer, cut two 20 inch pieces and two 7 7/16 inch pieces.  Once you have them all cut, secur...

DIY $100 kitchen makeover

Image
I've wanted to have our cabinets painted white for so long now, and with some push from my sister, I finally tackled the project. I heard form a lot of people that it was going to be a huge and difficult project. It took me three days to do this section and it wasn't all that bad. Here is what I did to update our kitchen on a budget.  This is what I started with. These outdated cabinets.  My first step was to clean them. I used TSP and gave them a good cleaning; boxes drawers and doors.  You'll need gloves and a rag. Just follow the directions on the box.  After cleaning them really well, I took the doors off the boxes and sanded them down. i was able to scratch them up and get the shine off. Then came the fun part - priming! This is where I actually saw some progress. I used Kilz primer, and painted one coat on with a good paint brush. I let it dry and added a second coat of primer.  Once the cabinets were all primed, I started painting...

Aimee Arrow Baskets

Image
        I have finally put this basket to use! I wasn't sure what I was going to use it for. At first I thought I'd use it for the baby's toys, but then I needed a place to put our living room throws, so I went with throw storage. I think I will buy another one for the toys as well, because it is so big and looks much better than the toy by we currently have.  This is the Aimee Arrow, World Market basket in large. Right now it has four throws in it, and one on top! Two medium sized ones and two kid throws, with the cream pom pom throw laying on top. If you're looking for a nice large basket, look no more! This one is perfect!

$200 Nook Chandelier Update

Image
Pin for later! Since we replaced our dining room chandelier , next up was our nook light. I kept going back and forth between the one we bought and a beaded chandelier. I ended up going with the crystal light because it matches our dining room one and goes with our overall theme better. I found our light at Overstock, and never thought I'd buy the chandeliers sight unseen, but after looking at the review pictures and reading the reviews, I felt comfortable with purchasing it. We got it hung and then I added all 271 crystals on. Once I got them all on, I was so pleased! I sat and looked at it for so long. Ha!  It’s a wonderful upgrade from what we had before, and didn’t break the bank! Ugly before light The chandelier is a Potterybarn styled fixture, but at such an affordable price. Pottery Barn version We got ours on sale for just under $150! I highly recommend this light if you’re looking for a budget friendly PB version or a fixture t...

One ingredient yogurt melts

Image
I've been seeing yogurt melts all over Pinterest and wanted to give it a go. It looked easy and I know the kids would love the melts.  I had some yogurt on hand, so the kids and I took to it... and they loved the melts! I saw where some people strained the yogurt in cheesecloth for an hour, or added other ingredients, but we tried to make it as easy as possible.  This is what we did:  Get your favorite yogurt. Using Greek yogurt will give the melts that sour flavor that the Greek yogurt has. If your kids don't like Greek yogurt, go with the regular yogurt. Line a baking sheet with wax paper. I had to cut ours to size. Spoon some of your yogurt into a sandwich bag. Once you have your yogurt in the bag, cut off the tip on one corner. It will look like this. Then squeeze all the yogurt to that corner. Squeeze out some yogurt onto your lined baking sheet. You can make these as big or small as you want. We made our...