Posts

Showing posts with the label diy

DIY $40 coffee table

Image
I had been searching for a coffee table for some time, and couldn’t find one that fit our space that was within our budget. So instead of getting anything, I decided to make a temporary table.  I wanted something simple and low profile. What started as a temporary table has now become our permanent coffee table and it fits our space well.  This table doesn’t require much, and is customizable in whatever length and color you want. Here are the simple steps I took to make this table: My first step was buying the supplies. I bought two 2x10x8 pieces of pine wood, which cost me $40. Then I measured out the length I needed and cut the pieces to size. I used my miter saw and had to make two cuts, because my blade wouldn’t cut all the way through in one pass.  This is what one cut with my miter saw cut. So I flipped the board, lined the cut up with the blade and cut another pass to fully complete the cut.  Once I had them to the size I needed, I ran the inside edges through...
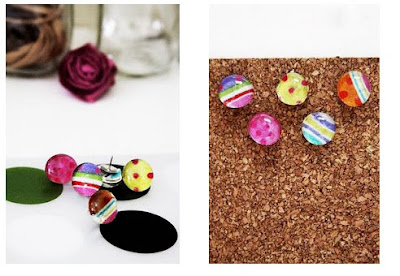
Tacks

Image
I transformed my plain tacks into something a little more fun. I used some scrap fabric and decorative flat glass rocks (I forget what they are called) to make these. I also made some with cute words. This is a fun and cheap way to jazz up your plain tacks and dress up your cork board! They can be made for little next to nothing! I bought the tacks and glass rocks from the dollar store. The rocks are usually used to fill vases and other decorative containers. They are in the floral section of the store. I bought the clear ones.  All you have to do is cut your scrap fabric to the size of the flat side of the rock, add some glue (any kind) and press the fabric to the rock. Then hot glue your tack to the flat side of the fabric covered rock. That's it! You can also print out names or words and do the same. The only thing I had to do different with the printed words, was cover the ink with a piece of clear tape, or else, my ink started to run when I added the glue.  

Lollipop Birthday

Image
My daughter's second birthday is in about two weeks, and I am just beginning to plan. I am in charge of all the decorations and details, and I have so much to do! This next week or two will be all about making decorations for a lollipop birthday party. Although you could use the same concept and make it for any theme that you would like. So this is my attempt at creating a lollipop birthday party on a budget! The favors I will be making are paper lollipops. I will also attach a clear bag of jelly beans to each lollipop. First, you will need to get your material together. For this project, you will need: cookie sticks (Michael's Craft) scrapbook paper/ construction paper differnt colored ribbon Gems - optional (any craft store) hot glue gun Your fist step is to create your image. I used Microsoft Word to create mine. It was pretty easy to do! You can make yours say whatever you would like. You can also change the wording to make these into birthday p...

Simple Black Baby Dress

Image
I had some extra fabric laying around from a skirt I made, so I wanted to try to make something for my daughter, Gia, with it. I had a little less than a yard to work with, and no pattern. I ended up using a dress that she has to get the shape I wanted. First, I laid the fabric down (folded in half) and cut out the new dress (allowing a little extra around the edges for seams.) Once you cut all the way around the dress, you should have two pieces. Keep these two together. Do this twice so that you have 4 pieces, keeping the sets together.. From there, fold each set in half to make sure the edges meet up. If there is more fabric on one side,trim it to match up. Now that you have two sets (dress A -top dress and dress B-liner), pin both dresses where the fabric is right sides together. Mark where the armhole starts, so that when you start to sew, you don't close the armholes. Now, we sew! I started at the armhole line and sewed down to the bottom. Do this for each side on ...