Posts

DIY $40 coffee table

Image
I had been searching for a coffee table for some time, and couldn’t find one that fit our space that was within our budget. So instead of getting anything, I decided to make a temporary table.  I wanted something simple and low profile. What started as a temporary table has now become our permanent coffee table and it fits our space well.  This table doesn’t require much, and is customizable in whatever length and color you want. Here are the simple steps I took to make this table: My first step was buying the supplies. I bought two 2x10x8 pieces of pine wood, which cost me $40. Then I measured out the length I needed and cut the pieces to size. I used my miter saw and had to make two cuts, because my blade wouldn’t cut all the way through in one pass.  This is what one cut with my miter saw cut. So I flipped the board, lined the cut up with the blade and cut another pass to fully complete the cut.  Once I had them to the size I needed, I ran the inside edges through...

The New House: moving is tough!

Image
Our nook in the New House It's been a week since we have moved into our new house, a week since we moved all of our lives and memories into 100 moving boxes. And what a bitter sweet move it has been. It's tough to leave a place where we poured our heart into. The place our babies called home and where we created so many memories at. But, this is a new year, a fresh start for us.  As tough as this move may seem right now, it is what's best for us as a family. We will make this house a home. We will create all new memories and love this house as much as we did our last. As long as we are all together, we can make anywhere home.  I am going to begin to document the changes we make to this house. It's a long list of things we want to do. Most of them are DIY projects. But for now, I will be here unpacking. 

DIY Easy RH Inspired Console Table

Image
I was on the hunt for a console table that would fit this wall.  All of the tables that I liked were wider than the wall, or outside of my budget. So I decided to build it myself. I knew the width and height I needed, then measured out my depth.  I used this Restoration Hardware console as inspiration.  After I had my measurements, I drew out my plan, and cuts.  I used a 1x6, six 1x2s and half a sheet of plywood. Since I wanted my table depth to be 17 inches, I had the plywood cut into 17 inch strips at Lowe's and then used a jigsaw to make the width cuts. Once I had all of my pieces cut, I used the pocket jig to make pocket holes to attach everything together.  I first applied some wood glue, then screwed all the pieces together.  I started by attaching the front faux drawer 1x6 to the 1x2s. My table is 29 inches wide, but you can make it to whatever width you need. From there I attached the legs to the faux drawer. this made ...

Affordable and large neutral rug!

Image
Are you looking for an affordable neutral rug? Look no further.. We had been on the hunt for a rug that matched our room and didn't break the bank. It's so hard to buy online, since I like to look and feel the rug, but this one had great reviews, the colors we wanted and all at a price that was affordable.  Shipping was quick and it was packaged so well. As soon as I got it inside, I unpackaged it and rolled it out. It took very little time for the wrinkles to flatten out, and I am so happy with how it looks! We bought the  Hillsby Gray Area Rug in the  7'10" x 10'3" It was on sale for $162. What a great deal! The colors are so good, if you are looking for a cream/gray carpet. It is surprisingly soft under the feet for the price.  Also loving the distressed look that it has.  At first we were looking for a rug that had some blues in it, but we decided to go with something a bit more neutral, so that we can mix up our...

DIY nightstand from IKEA dresser!

Image
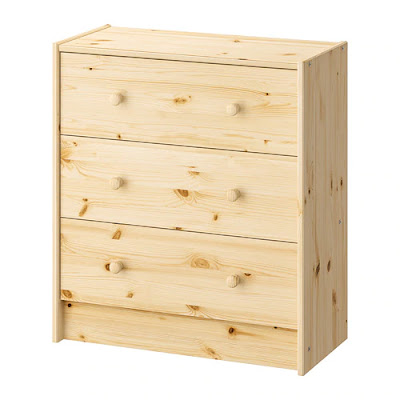
Have you seen these IKEA Rast dressers? I bought two of them when they were on sale for $27, and followed a tutorial on how to make them into this nightstand.  First, you will need to get your dresser. You can find them here .  IKEA RAST dresser Once you have your dresser, you will need to get the trim pieces.  I bought my trim pieces from Lowes, but you can find them at Home Depot too. I bough six trim pieces per dresser. So 12 trim pieces for both dressers.  Buy your top piece. For the top, you'll need to get a 1x16 inch board and have it cut down to 12 3/4''. You can ask the people at Lowes to cut it for you if you don't have a saw to cut it yourself. Once you have your trim, and your top (cut to 1x12 3/4 x 26 5/8''), it will be time to cut your trim to size.  You will want to cut your trim pieces as follows:  For each drawer, cut two 20 inch pieces and two 7 7/16 inch pieces.  Once you have them all cut, secur...

DIY $100 kitchen makeover

Image
I've wanted to have our cabinets painted white for so long now, and with some push from my sister, I finally tackled the project. I heard form a lot of people that it was going to be a huge and difficult project. It took me three days to do this section and it wasn't all that bad. Here is what I did to update our kitchen on a budget.  This is what I started with. These outdated cabinets.  My first step was to clean them. I used TSP and gave them a good cleaning; boxes drawers and doors.  You'll need gloves and a rag. Just follow the directions on the box.  After cleaning them really well, I took the doors off the boxes and sanded them down. i was able to scratch them up and get the shine off. Then came the fun part - priming! This is where I actually saw some progress. I used Kilz primer, and painted one coat on with a good paint brush. I let it dry and added a second coat of primer.  Once the cabinets were all primed, I started painting...