I am joining in on the sew along over at Project Run an Play (more on that later), and here is the first dress I made. This is a remix of the Junebug dress (more on this later, too).
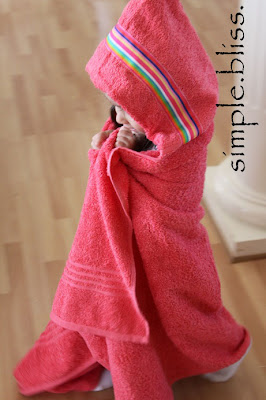
I just love the baby hooded towels, but my little one has grown out of them. I have been using regular towels on her, and I miss the hood. I came across this tutorial on how to make large sized hooded towels, but can't seem to find the tutorial anymore. I tried to recall as best I could, and tried to make a couple, here is what I came up with... This hooded towel is so easy to make and I LOVE how big they are! You can make any color you want, and add any color ribbon or fabric strips to the hood! Here is how I made this: First you will need a regular sized towel and a hand towel. You can also get matching ribbon or scrap fabric strips to add to the hood if you would like. I bough my two towels at Wal-Mart on sale for a little over $5. Take your hand towel, and cut it around 24 inches long. Fold your hand towel in half lengthwise, and cut your ribbon to the same size as the towel. Pin your ribbon to the towel, about 1 inch from the fold. Now o...
Here is a maxi skirt I made and wore for Thanksgiving. It is so easy and inexpensive to make! Material: Fabric: You will need to pick out the fabric material and color you want. I used a stretch knit from Joann's Fabric. (Don't forget to use your coupons when buying your fabric!) Elastic band First, you will need to measure how much fabric you will need. I measured from where I wanted the skirt to start, down to the floor, for the length. For my skirt, I got 45'' in length (keep in mind the type if shoes you will be wearing with your skirt. For flats, it will need to be shorter, for heels, measure longer.) The great thing about this material is that I did not need to finish any edges! It will not fray and looks fine unfinished. Woo hoo! :) Next, you will need to measure your waist for the elastic length. Keep in mind that your length will need to be about an inch shorter than your waist measurement. The elastic will stretch and fit your waist snug. If ...
For my daughter's birthday, we ordered cupcakes instead of a cake (except for her cake.) To go along with the cupcakes, I made this cupcake tower. The entire stand cost me less than $10. First, you will need to get your materials. This is what I used: 14'' cake boards (2) 12'' cake boards (2) 10'' cake boards (2) 8'' cake board (2) floral block (I bought green, it is best to use white) three cans glue gun (I purchased my cake boards at a cake supply store. That way I was able to buy singles instead of having to buy a package of 8 in each size. They cost 0.13 - 0.29 each.) The first thing I did was to cover the block with fabric. I used white fabric. I measured the width of the block and cut a strip. I cut it a little taller than the block so that I would be able to fold it over and glue the fabric to the top of the block. Hot glue all around the edges on each side. One side at a time. Push firmly on...



Comments
Post a Comment