Posts

Showing posts from April, 2011

Felt Finger Puppets

Image
Just in time for Easter. If you need any last minute Easter basket ideas, here is one easy idea! I made these little guys while I was watching the munchkin color. They are quick, easy and fun for the babies to play with.  All you will need is some felt, embroidery floss/hot glue/thread. I used the floss, but you can always hot glue the edges together, or even hand sew with thread, or with your sewing machine.  First, pick out your felt. Then cut out your bunnies. I cut one out of paper, then traced it to the felt and cut all the bunnies out. Make sure to cut two of each color since we will be placing them on top of each other to create the opening in order to slip them onto our fingers. Take one side of the bunny and run your needle through it on one bottom corner. make sure the floss is tied in a knot so it doesn't run all the way through. (if you are using hot glue, just hot glue the edges of this side and place your second bunny side right on top. if you are going to sew

DIY Hooded Towels

Image
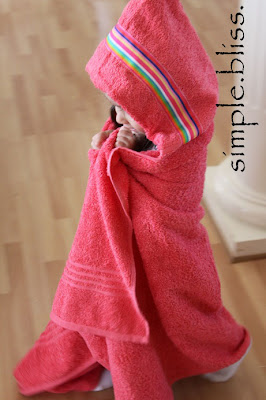
I just love the baby hooded towels, but my little one has grown out of them. I have been using regular towels on her, and I miss the hood. I came across this tutorial on how to make large sized hooded towels, but can't seem to find the tutorial anymore. I tried to recall as best I could, and tried to make a couple, here is what I came up with... This hooded towel is so easy to make and I LOVE how big they are! You can make any color you want, and add any color ribbon or fabric strips to the hood! Here is how I made this: First you will need a regular sized towel and a hand towel. You can also get matching ribbon or scrap fabric strips to add to the hood if you would like. I bough my two towels at Wal-Mart on sale for a little over $5. Take your hand towel, and cut it around 24 inches long. Fold your hand towel in half lengthwise, and cut your ribbon to the same size as the towel. Pin your ribbon to the towel, about 1 inch from the fold.  Now o

Repurposing Baby Clothes

Image
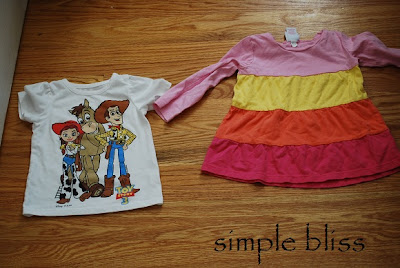
I was going through some of my daughter's clothes, looking for items that needed to be donated. I came across this Toy Story shirt that she loves. It is a little too short, so she doesn't wear it anymore, but instead of donating it, I thought I would make it re-wearable! Here is what I ended up doing to make her a whole new outfit out of some old clothes... This is the Toy Story top, and another small top that I will use to make the Toy Story top longer.  I decided that I wanted to use the center piece (yellow and orange) to add onto the bottom of the shirt. So I measured how long I wanted the shirt to be and then cut out as much as I needed to make it that length. The next step was to sew the hem. I am using a stretch knit, so I could have left the edges raw, and it would not fray, but I wanted to sew it and get a little ruffle into the bottom. Since this is stretch knit, I pulled the material a little as I was sewing, which gave it a ruffled look.  On