Posts

Showing posts from 2012

Stuffed Horse, attempt 1!

Image
  Here is a stuffed horsed I made for my daughter. This was my first try using a pattern I made out of newspaper. There are a few things that I need to tweek before I make another one, but overall, I am very pleased. Next time I am going to add a tail, and a patch on the back to look like a saddle.  Maybe even some ears too. You can also add a horn if you want to make a unicorn. There are a lot that can be added on to this little guy! If any of you would like to make one, it is super easy!!I will have to add a tutorial soon. It is a big hit with the munchkin! She just loves her horsey! I am looking to make an elephant next!

Alice in Wonderland Dress Tutorial

Image
Since I had some blue fabric left over from making the curtains from the baby shower, I decided to make the little one an Alice dress. It actually was pretty easy to do, even for an amateur sewer like myself! Here is what I did. This is the finished dress with apron.   First you will need to cut out your pieces. You can make you own pieces by following the steps in the ruffle dress  TUTORIAL . You may want to read this tutorial first for all the steps, since I will be running through these quickly. The only piece not included is the collar. That will be in the second tutorial on the Alice dress, along with the apron instructions.  Also, I cut a V in the back of the bodice. I will attach a button for closure. I did this, so it will slip on over my daughter's head, and I didn't want to add a zipper or multiple buttons. :)  Once you have your pieces cut, you will need to press the casings for the sleeves. Go ahead and fold it over once.   Then press with the iron.   

Happy Firday!

Image
  When I do laundry, I always forget to check the pockets before I throw them in the washer/dryer. Luckily I haven't washed anything that I really needed, or something that would ruin the clothes. But every once in a while I do find some money! So now I have a change jar next to the washer and dryer. :) Every time I find any of this stuff I drop it in my jar. One day I might have enough to buy some... hmmm, maybe more laundry detergent?! ...so the way I see it, is that I get paid to do my own laundry! Nothing is better than finding money. Well, yes there is something better... finding CLEAN money! Happy Friday! I sure am having a great Friday... as of 2:30am, I am a new auntie! I've been wanting to make a baby quilt for my little nephew for some time now, but I haven't found the time to do so.. and now that he decided to make his debut a few weeks early, I am really behind! Time to get sewing!!

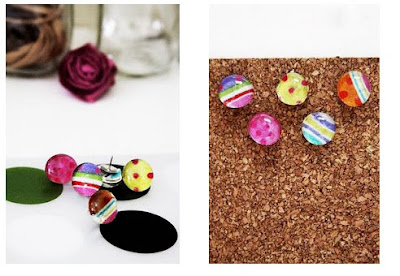
Tacks

Image
I transformed my plain tacks into something a little more fun. I used some scrap fabric and decorative flat glass rocks (I forget what they are called) to make these. I also made some with cute words. This is a fun and cheap way to jazz up your plain tacks and dress up your cork board! They can be made for little next to nothing! I bought the tacks and glass rocks from the dollar store. The rocks are usually used to fill vases and other decorative containers. They are in the floral section of the store. I bought the clear ones.  All you have to do is cut your scrap fabric to the size of the flat side of the rock, add some glue (any kind) and press the fabric to the rock. Then hot glue your tack to the flat side of the fabric covered rock. That's it! You can also print out names or words and do the same. The only thing I had to do different with the printed words, was cover the ink with a piece of clear tape, or else, my ink started to run when I added the glue.  

Gone Fishin' Tutorial

Image
We were at Target the other day, and the little one wanted a princess fishing pole. I did not want to buy her the pole, and have it sit in her room, never to be used. So I decided I was going to make her a fishing game she could play inside the house. This is what I came up with: Her very own fishing game. I used some left over felt squares, paper clips, string, a magnet and a wooden dowel. This is SO easy to make, and she has been having a blast with it since! First you will need to get your material: Felt  Paper clips Wood dowel Magnet String or embroidery floss and needle. glue gun Fish outline Once you have your material, take your first felt piece, fold it in half... Lay your fish outline on your felt piece, pin, and cut it out. You should have two pieces. Keep them laying on each other as is. Take your floss, and tie one end. Thread the other through your needle. Start at the mouth of the fish. From the inside,