Posts

Showing posts from 2011

Maxi Skirt Tutorial

Image
Here is a maxi skirt I made and wore for Thanksgiving. It is so easy and inexpensive to make!  Material: Fabric: You will need to pick out the fabric material and color you want. I used a stretch knit from Joann's Fabric. (Don't forget to use your coupons when buying your fabric!) Elastic band First, you will need to measure how much fabric you will need. I measured from where I wanted the skirt to start, down to the floor, for the length. For my skirt, I got 45'' in length (keep in mind the type if shoes you will be wearing with your skirt. For flats, it will need to be shorter, for heels, measure longer.) The great thing about this material is that I did not need to finish any edges! It will not fray and looks fine unfinished. Woo hoo! :) Next, you will need to measure your waist for the elastic length. Keep in mind that your length will need to be about an inch shorter than your waist measurement. The elastic will stretch and fit your waist snug. If

Graduation Cupcake Stand

Image
Here is a graduation cupcake stand I was asked to make for a party this Saturday. The school colors are hunter green and gold. I bought the fabric and trims from Joann's fabric. The top is a graduation cap with a tassel I made. I took a 10inch cake board, and cut it into a 7'' square, then wrapped it in back. I added a button that I wrapped in the same black fabric and a tassel I made out of embroidery thread. The great thing about the top, is that you can put cupcakes on it as well as the other layers! Find the cupcake stand tutorial HERE ! Check out the new post !  Nook update!

DIY Cupcake Ornaments

Image
I saw these really cute ornaments online that were selling for $20 each. They looked like they were pretty easy to make, so I took a stab at it.  My daughter helped me make them, which was quite interesting. First you will need to get your supplies: Styrofoam Balls - I bought a pack of 6 from Joann's Fabric Glue   Glue Gun Glitter  Bells Cupcake cups Paint brush - optional String/wire One you have all your supplies, I would suggest to lay out some newspaper. This may get a little messy. Well, with my little helper, things got pretty messy. Take your ball, and glue the top half. I swirled the glue, then used the brush to spread it evenly all over the top half.  Now, cover the glued half with your glitter. Shake off any excess. If you have any spots that are not covered, just dab a little glue and sprinkle on the glitter.  Take your cup and glue the upper edge. Make sure to glue all the way around. Take your ball and push it gently into the cup. You do not need to push it al

How to - yarn balls

Image
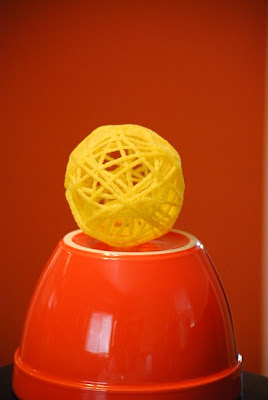
Here it is! A yarn ball. We only made three of them, and will make more soon.  I did not take any pictures of how to make them, but it is pretty simple.  First you need your supplies: Balloons Yarn School Glue -  I used the white Elmers Glue with the orange top.  Parchment paper Steps:  1) Mix your glue and water in a bowl. I dumped the entire glue bottle in the bowl, then filled it with water and dumped that in too. So I used a 1:1 ratio. The mixture should be of a house paint like consistency.  2) take your yarn and put it into the glue mixture. I did not cut the yarn from my yarn roll, because I wasn't sure how much I needed. If I needed more yarn, I pulled more from my roll and put it in the glue mixture.  3) wrap the yarn around your balloon.  Once you are done wrapping the yarn, cut it from the roll and dip the end in the glue, then tuck it under a strand on your balloon.  4) squeeze the balloon to get some excess glue off your yarn ball.  6) repeat this for all your ballo

Colorful yarn balls!

Image
I was searching the Google images for party themes, and I came across this picture! Since tomorrow is going to be a rainy day, you can bet the little one and I are going to try to make these. Maybe not as big. As soon as we get it, I will post a tutorial! Aren't they great! There are so many possibilities... birthday decorations, hanging in the corner of my daughter's room, in a bowl, or I might even try to make some kind of Christmas decorations with this. I will be back for more on this.

Pom Pom Filled tutu

Image
This is a few days late, but I have a sick daughter at home, so I haven't had time to post this. So finally, here is the tutorial! I had some left over black tulle and was going to make a simple two later tutu for my daughter, but when I was at Target they had these pom poms in the dollar section. I bought them knowing I could use them for something. Then I went to make the tutu, and decided to add them in! First thing you will need are the supplies: Pom poms. Elastic for waist. Tulle Once you have all your supplies, it is time to get started! First thing, is get your measurements for the tutu. First is the waist. Take your daughters waist measurement and add about 12-15 extra inches to that. The more inches you add to the waist measurements, the fuller the tutu will look.For example, I will need 23 inches and I will add 12 to that. So I need to cut 35 inches. Second, you will need the length measurement, then add two inches to that,  then multiply that by two. For examp

Another Doll Outfit

Image
I have a tutorial on a pom pom filled tutu, but that is for tomorrow. ...so for now I will show you this! Another outfit for Emma the doll. :)

DIY Bath Toy Net

Image
This project cost me about $3 and took 10 minutes to make! Super easy and cute.  We had a toy holder that I bought from Target, but it did not drain completly, causing some of my daughters toys to have mold on them! I had to throw out the toys and toy holder. So in the mean time, we have been throwing the toys between the counter and bathtub. What a pain!  The other day I was at the fabric store and saw this netting. It is right next to the tulle. It was 1.49 a yard, and I had a 40% off coupon! I bought a yard (way more than I needed) and wanted to try to make a net for her bath toys. Since it is netting, I know it will breath and drain well.  First thing I did was cut the netting to the size that I wanted. I left the netting folded in half, as it came, and used the fold as the bottom of the bag so that I only had to sew the two sides.  I sewed both sides. You should now have your bag. The bottom should be the fold and the two sides sewn, leaving the top open. The nice thing abo

First Outfit

Image
Here is the first outfit I made for the Emma doll. It is a little messy since I didn't have a pattern to go off of, and little time to complete it, but it is a start! My daughter picked out the fabric. I made her an outfit, and had it sitting by me sewing machine to fix, and when she saw it, she wanted Emma to have a similar outfit. So I pulled out some scraps and got to work. Here is my little one's outfit.  I made the doll a pair of pants, a tank top, a vest, and a matching headband. If you look they also have the same purple crocs shoes on. :) The tank has ribbon straps that velcro in the back. If anyone is interested I will make a tutorial on how to make this. I promise I will dedicate more time on the outfit so it doesn't look as messy in some areas. :) One outfit down, may to go!